
I've accepted the fact that I have expensive taste. I don't know what it is, but I tend to gravitate towards expensive things. Unfortunately my taste doesn't always match what's in my our bank account.
What caught my eye:
 |
| $729 Price Tag |
You have to know when to pick your battles with DH and I knew trying to convince DH to spend that kind of cash on an end table would have been a waste of time. I had to get a little creative, which for me usually means bringing out the paint brush.
During a recent shopping trip to our favorite antique store, I scored The Knock-Off!
 |
| $300 Price Tag |
Already stripped, sanded, and in great condition, this piece was a great buy!

 |
| The trick to preventing paint from peeling and flaking |
You're probably horrified at the site of me painting over hardwood floor but it was cold outside! And you haven't been in my haunted basement!
Step 1: Apply a thin even coat of primer. It's important to let the paint dry completely before applying more paint—make sure you thoroughly read the instructions before applying your second coat!
 |
| Make sure to have a window open! |
Step 2: Apply latex-based paint. With a new clean brush, apply a thin coat and don't worry about the lines! When you use a good paint brush and paint, lines are minimal and good paint self corrects. For this piece I used Glidden's Semi-Gloss (for a bit of shine) Onyx Black. Don't worry about applying latex-based paint over oil-based paint, it's the other way around that often leads to the bubbling and DIY disaster! Remember, latex after oil!
 |
| Invest in quality paint and brushes |
 |
| Almost done! |
 |
| For easy cleaning! |

Step 4: After applying your final coat of sealer, wait at least 3 full days (72 hrs) before placing anything on top
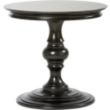
 |
| $729 Worthy for only $341 |
Dollars & Cents:
End Table: $300
Oil-based primer: $8
Paint: $12
Paint Brushes: $21
Project time: 1 day/ 3 days for drying
No comments:
Post a Comment