Wednesday, October 17, 2012

Bathroom Update: Part 2

Yep, we are still at it with our bathroom!  I know, I know.  I have been absolutely horrible with providing progress updates!  It's true, you really can't give your best to a 12hr-day job, philanthropy activities, a happy marriage, friends, family, and a blog all at the same time.

But I hope you can forgive me and enjoy the pictures below!!  I am so excited with how all the moving pieces that go into the design and construction of a major bathroom renovation are coming together!!

Let me remind you what the bathroom use to look like


Band-aid Solution

From demo to the finish carpentryless plumbing and electricthis is all because of DH's amazing handywork.

Halfway Through


We splurged a little on our fixtures, but don't you wish this was your shower?


Tuesday, September 18, 2012

Sneak Peak: Upstairs Bathroom

A week into our slower-than-a-hare bathroom remodel and our AMAZING plumber just came over and installed our new right out of the box tub!

Here's a sneak peak!

Long baths ahead

Monday, September 3, 2012

Holidays = Savings!

Happy Labor Day!

While DH spent his time tidying up the backyard and organizing his mancave, I spent the long weekend laying on the beach getting some much needed R&R.  However, relaxing on the beach catching up on your summer reading list is no excuse to miss out on the holiday sales.


We spent the last day away from the office squeezing out extra savings from  the big box stores, saving an extra $1000 on our shiny new appliances!  Holidays are a great time to purchase appliances because most, if not all, stores have additional sale promotions on top of their already discounted items.

We originally budgeted $8000 for appliancesor 20% of our kitchen budgetand thanks to the sales we came in $2154 under budget!  Thank you Labor Day!

GE 29 cu. ft.  French Door Refrigerator 
Reg: $2500 Holiday Sale price: $1978

GE Cafe 30" Gas Convection Range
Reg: $3199 Holiday Sale Price: $2879


GE Profile 24" Dishwasher
Reg: $1099 Holiday Sale Price: $989.00


What did you do this Labor Day?

Saturday, September 1, 2012

Sneak Peak: Our Kitchen

Our draft kitchen design is in!!!  It does not look like the drawing I drew in Bermuda, but if you can't add space, you have to work with what you have.

Here is a sneak peak!

The Dream Kitchen?


So what do you think?  Anything you would change?

Sunday, August 19, 2012

Vacation— Bermuda 2012

We're on vacation in sunny Bermuda!    

DH's Photog Skillz


And what does a renovation addict do while catching a tan on a beach with pink sand?  She sketches her dream kitchen of course!!

Dream Kitchen Number Ten

I can't believe I'm saying this after begging DH for a break after our dining room rehab, but, I really can't wait to get started on this kitchen!!!  

Saturday, August 4, 2012

A New Front Gate

Demolition is like your favorite donut, you can never just have one.  That's exactly what led our eyesore cinder block to meet its demise.  With a few daylight hours left in our dining room demo day, DH had to tackle another demo project.  

Original Cinder Block Fence

Muscle Building

Inspecting His Handy Work

Remember to ALWAYS wear safety equipment during a project even if your project is a last minute must-do.


I cleaned the area, prepared it for the new fence, and applied the stain.

Cleaning Up The Pieces

Our new fence had to have a few design musts.  It is tall enough that it hides the pool in the back yard from the curious kids in the neighborhood and the opening is wide enough for our cars to make it through. 


After: Our New Gate 
Dollars and Cents: 

Demo: $0  Doing the demo ourselves saved us $300 in labor and clean up costs.  
Fence: $400  We scored a deal on labor and materials by scouring Craigslist for contractors looking for work in the off-seasona tidbit to consider when planning your project's timeline.   

Monday, July 30, 2012

Inspiration Board— Dining Room

I have a dining room inspiration board!  I have a dining room inspiration board!!  Can you picture me jumping around in excitement?  Because I am!  Two months after completing construction—which you can read about it here — and a handful of weekends looking through furniture and antique stores, I finally have an inspiration board that both DH and I are excited about.  


1- Love, love, love this tin antique mirror I picked up for $100 at my fave antique store!  It's 36" in diameter and really heavy!  Hopefully an anchor in a stud will keep this beautiful round mirror with its original glass hung over our new server!


2- I love the curves and classic movement of this Josephine side chair from Ethan Allen.  Of course I had to add modern fabrics for a dose of personality.   


3-  I picked a child safe funky green and blue fabric pattern for the back of the chair and  sand colored fabric for the seat and back. 


4- If this chandelier looks familiar that's because it currently hangs over our existing dining room table.  I know it's a design risk having a rectangular chandelier hang over a circle table, but I think it will work.  Want to hang your own light fixture?  Check out our DIY instructions and avoid spending $100+ on instillation.   


5- Our layout!  Nicole, a designer at Ethan Allen, and I worked together to create this floor plan.  Don't be afraid to leverage a professional!  I'm the first to admit  that despite having an eye for decor I lack the ability to visualize dimensions and movement in a room. 


6- DH spotted this Ethan Allen windchester dining table on the showroom floor and calls it his "statement" piece.  Without the leaf, the table spans 60" seating 6 and up to 78" with a leaf seating 8.  Can't wait to have Thanksgiving dinner on this table!   


7- My DIY curtains— read about them here!  Just finished another pair for only $74!  That sewing machine is getting a lot of use.  


8- Inspiration-  How do you tie a kitchen/dining room open layout?  With a rug!  A soft green pet and child friendly carpet (suggested by Nicole) will make the room flow from dining to kitchen room and anchor all of the bright colors we have on the walls and fabric.  


9- Our wall color.  Hands down Benjamin Moore makes the best blues ever!  Whether you color match it at your local hardware store or you buy it at BM, you can't go wrong with Santa Monica Blue. 


10-  By now I've probably overused the word "love", but, I can't help but absolutely LOVE this howell server from Ethan Allen.  What do I love about it?  The angles, the shape, the hardened leather covering the entire piece.   This piece is the perfect example of an infusion of contemporary (it's shape) and classic styles.

Sunday, July 22, 2012

Our Month Long Sabbatical

What's a pitfall of going on vacation?  Returning to your fixer upper extremely relaxed that you don't want to tackle another DIY project for a really really long time.  That dated light fixture you wanted to replace?  After your vacation, you start to think that the darn thing doesn't look so 1980s anymore.

Almost two months after our vacation that California feeling has worn off.  As we prepare to get back into the DIY swing of things, here's our road trip recap. 


"The Sign"
Focused.  Trying not to drive off the narrow Pacific Coast Highway
My navigator & Paparazzi
Not Our Fixer Upper-- Hearst Castle  
I will continue to be haunted by coffered ceilings!
Despite the glamorous woodworking and ceiling art, I found Hearst Castle to be dark, cold, and uninviting.  With all of the colors we observed driving up the golden coast, this one time home seems out of place.
 Unimpressed 
I wish I could lay on the beach all day!

DH's vacation highlight
San Fran's Golden Gate
Tourists

Tuesday, June 5, 2012

Dining Room—Construction Done!

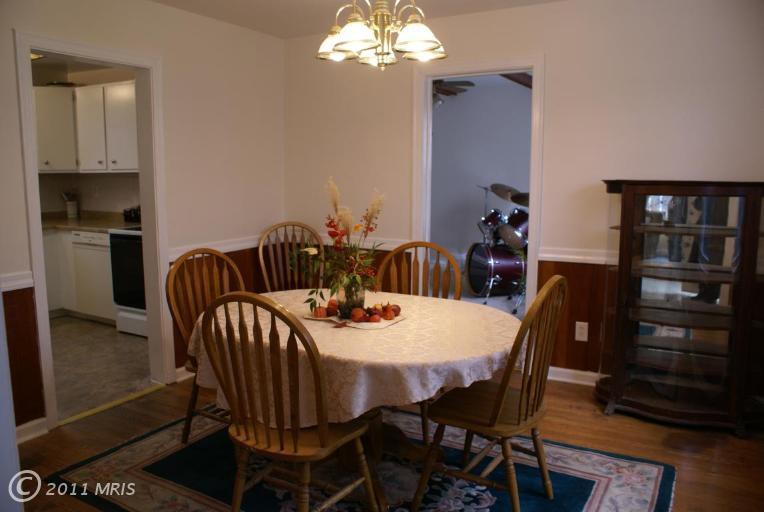
We have a dining room again!  Can you believe we got it all done in just two weeks?!

I'm really happy with how everything turned out despite all of the noise and dust.  Two weeks post-construction and I can vaguely remember how bad the dust really was.  I think about how amazing it is to look at our "before" pictures and see the difference we've made, especially since 80% of this project was DIY!

Before: I'm so excited that we took this room from 70s drab

After: To modern classic!  (Don't mind the first apartment furniture!)


Here's the recap:

We demo'ed the room to the studs, took down a load bearing wall, and added a beam.  We outsourced the  beam building and our HM also stuck around to teach DH and I how to remove the existing wall and replace it with the beam.


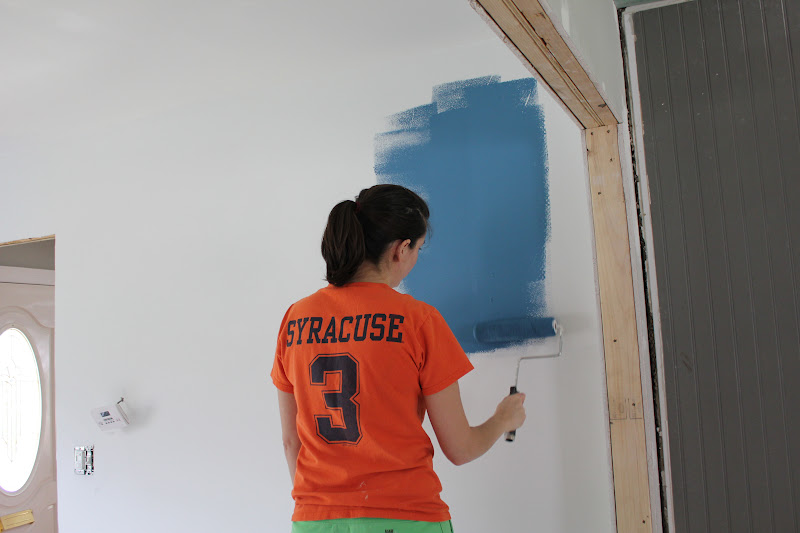
We had an electrician wire the room for recessed lighting—electricity is not something I'm comfortable around yet—added insulation, and drywalled our first room!


We breezed through the remaining items on our to-do list after the drywall mud dried.  Once dry, we sanded, painted, added molding, designed and built the wainscoting.


I can't wait to create a dining room inspiration board and find great furniture!  I really want a round dining room dinner table and funky chairs.  


What do you think?

Dollars and Cents


Yep, I admit it, I blew my budget.   But there is good news; we finished the project on time!  Well almost, we still need to caulk the crown molding seams.  

We blew our budget by $500 not factoring in the estimated $500 we lost in materials in the coffered ceiling debacle.  So $500 isn't really that bad right?

Where did our $3500 go? A large chuck of our budget went to the expected big ticket items including the load bearing wall ($1300), the removal of the construction material ($500), and recessed lighting ($400).  A big chunk also went to the expensive crown molding ($350) DH fell in love with while traveling on our honeymoon.  Insulation, paint, drywall, the remaining molding and wainscoting cost an estimated $950.  

Was it worth it?  Definitely.  The removal of the load bearing wall really opens up the space and flow and it's a great solution to the 600sqf addition that would take forever to save for.

Tuesday, May 29, 2012

California Road Trip

What's the perfect cure to DIY overload?  A road trip!  Just a week after finishing our dining room renovation we're in California enjoying the sun, the beach, and celebrating the beautiful wedding of our friends Katie and Dave.

We're taking the week off from DIY projects and driving from Laguna Beach to Napa.   Of course, it's not a true California vacation until you take the cheesy tourist pic.


Wednesday, May 16, 2012

Almost There— Dining Room

We got a ton done this weekend!  It's actually starting to look like we have a dining room again.  And, to be honest, I'm so ready for this project to be over.   Sixteen days in and I need a break from all of the dust and noise.  I need to eat at a dining room table again and not on my couch.
  
We started the weekend sanding the room and creating a dust storm.  TIP-  OPEN WINDOWS and cover the doorways when you do this.

It took a few hours to sand the drywall mud

DH looks like he's smiling as he applies drywall primer and sealer, but don't be fooled he was as miserable as I was. 

PVA Primer and Sealer preps new drywall for paint

We have wainscoting in the living room and want to continue the pattern through out the house.  measured the wall 36" from the floor and used a laser leveler and blue chalk to mark where we'd paint the blue and white paint.  


Mom and Dad lending a hand

Nine months after moving in DH and I can paint in our sleep!  We used Benjamin Moore's Santa Monica blue in a flat finish for the top of the wall, Behr's Snow Fall in semi-gloss for the wainscoting, and Behr's Swan Wing for the ceiling.  We painted the ceiling and moldings in different shades of white so that they don't blend into each other and you can easily see the crown molding's design when up against the ceiling.


After painting we tackled the coffered ceilings.  Unfortunately, DIY coffered ceilings weren't meant to be and I'm going to need a separate post to walk you through my melt down.

What DIY projects did you tackle this weekend?  How did you handle your first major construction project?