
It's Up! Took a little over an hour, including a last minute run to Target to pick up the "special bulbs" and a quick google search referencing the Idiot's Guide to Electrical Wiring and ta da! We have a new dining room chandelier!!!
 |
| Remember to turn off the power |
 |
| DH wondering if he should touch it |
The last thing we wanted to do was end up on DIY Network's Renovation Realities so we read the directions four times to ensure we were connecting the wires correctly.
 |
| Pairing the wires |
I'm still amazed that we actually got it to hang! Who would have thought 71 year old plaster was so strong!!!


And it works!
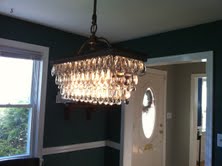 |
| We may need to purchase brighter lights |
Dollars & Cents:
My math skills occasionally resemble those of an Enron executive when it involves getting something we (I) want. So in order to get the DH's blessing, I had to maximize the savings.
- Pottery Barn's Clarissa Glass Drop Rectangular Chandelier: On Sale for $249, originally $449.
- DIY installation: $0, Quote from the Electrician $150
Spent: $290 Saved: $350
No comments:
Post a Comment